Jonathan Thomson's web journal

SmartHomeControl October 24, 2021

Filed under: Electronics — jethomson @ 8:17 pm
Tags: , ,

SmartHomeControl repo on GitHub


This is a Swiss army knife of a ESP8266 project. It is born from the desire to play with the control of smart home devices without having to run a Home Assistant server. It does the following:

  • Creates a web interface for turning on/off several devices in one panel.
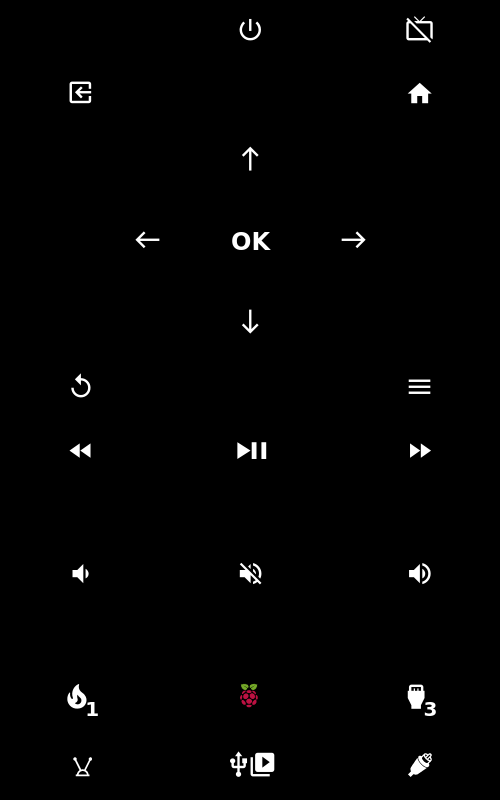
  • Creates a web interface for controlling a TV with an IR blaster.
  • Simulates Wemo devices with Fauxmo to allow voice control using an Echo device.
  • Controls devices based on 433 MHz RF signals received.
  • Runs an LED ring clock.


Your ESP8266 can be programmed over the air in a couple of ways:

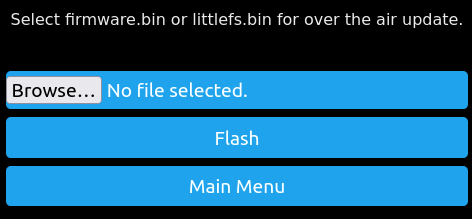
  1. Use the Select Bin File option in the web interface The bin files can be found in .pio/build/nodemcuv2. To create firmware.bin simply build the project. To create littlefs.bin click the ant logo, and click Build Filesystem Image.
  2. Use the espota upload protocol in platformio. This is already setup in the included platformio.ini. To flash the firmware click upload. To flash littlefs.bin click the ant logo, and click Upload Filesystem Image.


A few accomplishments I’m particularly proud of:

  • To correctly write a littefs.bin that is uploaded via the webpage’s OTA method requires having the exact size of the bin file. However, when uploading a file the header’s Content-Length is the size of the bin file plus the number of bytes in the header and footer. The header and footer size varies between browsers so it’s impossible to get the actual size of the bin file using request->contentLength(). To work around this I used a hidden filesize parameter in the select_bin html page which is set and sent alongside the bin file when the upload is started: document.querySelector(‘form’).addEventListener(‘submit’, (e) => { document.getElementById(‘filesize’).value = document.getElementById(‘file’).files[0].size; … }); Then the firmware’s flash handler can get the actual size of the bin file with: filesize = request->getParam(“filesize”, true)->value().toInt(); An alternate solution is to use javascript to upload the bin file and set X-File-Size in the header, but I found that approach to be much less reliable than using the browser’s native upload capabilities.
  • I updated the AsyncHttpClient library to allow multiple simultaneous async requests.
  • I updated the NTPClient library to use the Timezone library so manual adjustments aren’t necessary when daylight saving time starts/ends.
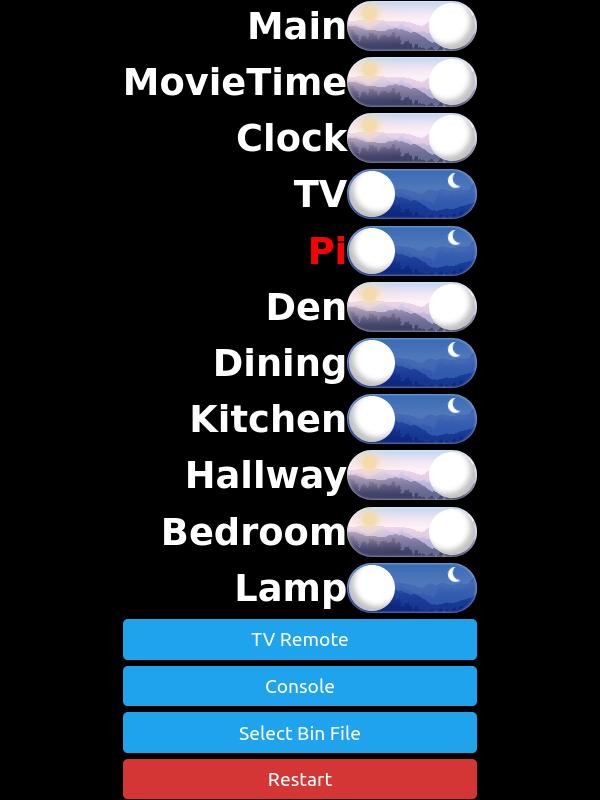
  • data/smart_devices.json is used to generate the smart device controls that appear on the web page. To add or remove devices you simply edit the json file instead of editing the web page. You can also create groups of devices (e.g. Main and MovieTime in the screenshot below)


Control Panel


IR Blaster Web Interface


Web OTA updates of both the firmware and filesystem


ReAnimator Demo March 8, 2019

Filed under: Electronics,Halloween — jethomson @ 5:41 pm
Tags: , , , ,

For my Lilliputian Alien Abduction costume I wrote a class called ReAnimator that generated all the UFO’s LED animations. To make it easier for someone to demo all the animations I wrote a program that runs all of the patterns and shows how to use the ReAnimator class. Here’s a video showing all of the patterns combined with different overlays.


ReAnimator-demo on GitHub


Project Ouroboros Update February 20, 2019


I reworked the code and the article for Project Ouroboros. You can see the update by clicking here. When I originally wrote the article in 2011 a USBasp programmer was around $6 on eBay, but now you can buy one in 2019 for about $1.50; pretty amazing.


Here’s some code I wrote for the USBasp programmer board I played around with in Project Ouroboros. A bit surprisingly I had no trouble powering a WS2812B strip with just 3.3V. If you run this code on a 5V board you should change LED_STRIP_VOLTAGE to 5, although it’s not strictly necessary because that number doesn’t actually control the voltage. If you do change it to 5 then the power allotted to the LEDs will increase and they will get brighter. I tested the board with 100mW for the LEDs and I had no problems.


#include 

#define NUM_LEDS 8
#define DATA_PIN 12 // MISO pin
#define FRAMES_PER_SECOND  125
#define LED_STRIP_VOLTAGE 3.3
#define LED_STRIP_MILLIAMPS 20

CRGB leds[NUM_LEDS];

void setup() { 
    FastLED.setMaxPowerInVoltsAndMilliamps(LED_STRIP_VOLTAGE, LED_STRIP_MILLIAMPS);
    FastLED.setCorrection(TypicalSMD5050);
    FastLED.addLeds(leds, NUM_LEDS);

    pinMode(14, OUTPUT);  // green LED, LOW == ON
    digitalWrite(14, HIGH);  // turn green LED off
}


void blink() {
    static uint8_t i = 0;
    uint8_t brightness_bool = i++/128;
    digitalWrite(14, !brightness_bool);   // green on board LED, LOW is ON
    leds[0] = CHSV(0, 255, 255*brightness_bool);
}


void breathing() {
    const uint8_t min_brightness = 2;
    static uint8_t delta = 0; // goes up to 255 then overflows back to 0

    // for the LEDs in the current state setting the brightness higher than max_brightness will not actually increase the brightness displayed
    uint8_t max_brightness = calculate_max_brightness_for_power_vmA(leds, NUM_LEDS, 255, LED_STRIP_VOLTAGE, LED_STRIP_MILLIAMPS);
    uint8_t b = scale8(triwave8(delta), max_brightness-min_brightness)+min_brightness;

    FastLED.setBrightness(b);

    delta++;
}


void loop() {
    static uint8_t dynamic_hue = 0;

    //blink();
    //fill_solid(leds, NUM_LEDS, CHSV(dynamic_hue, 255, 255));
    fill_rainbow(leds, NUM_LEDS, dynamic_hue, 21);

    //breathing();  // breathing isn't meant to be run by itself. combine it with one of the functions above.
    
    EVERY_N_MILLISECONDS(100) { dynamic_hue+=6; }
    FastLED.delay(1000/FRAMES_PER_SECOND);
}


Code
Project Ouroboros on GitHub


A smooth breathing effect while using FastLED’s power management February 6, 2019

Filed under: Electronics — jethomson @ 9:01 pm
Tags: , , , ,

If using a FastLED function (e.g. FastLED.setMaxPowerInVoltsAndMilliamps()) to manage how much power your LEDs use FastLED limits the maximum brightness that can be set to a value that does not exceed the requested power draw. So if FastLED determines your power limited maximum brightness is M then calling setBrightness() with a value greater than M will result in FastLED setting the brightness to exactly M.

A breathing effect ramps the brightness up until it reaches the maximum brightness then ramps the brightness back down to a minimum brightness then starts the whole cycle over again. A naive approach would be to use a triangle wave that goes from 0 to 255 and back down to 0 as the input for setBrightness(), but if the power limited maximum brightness M is less than 255 then the brightness will plateau at M, and the brightness will remain fixed until the triangle wave input falls below M again. My breathing() function achieves a continually changing brightness by setting the peak of the triangle wave to M. However, M changes based on the number of LEDs currently lit and their colors, so breathing() recalculates M before setting a new brightness value.

 
Snippet from the breathing code example available on GitHub:

void breathing(uint16_t interval) {
    const uint8_t min_brightness = 2;
    static uint8_t delta = 0; // goes up to 255 then overflows back to 0

    static uint32_t pm = 0; // previous millis
    if ( (millis() - pm) > interval ) {
        pm = millis();

        // for the LEDs in the current state setting the brightness higher than max_brightness will not actually increase the brightness displayed
        uint8_t max_brightness = calculate_max_brightness_for_power_vmA(leds, NUM_LEDS, 255, LED_STRIP_VOLTAGE, LED_STRIP_MILLIAMPS);
        uint8_t b = scale8(triwave8(delta), max_brightness-min_brightness)+min_brightness;

        FastLED.setBrightness(b);

        delta++;
    }
}


You may have read that you need to apply gamma correction or convert luminance to brightness so that the LEDs have a linear response. That is what I tried first, I never had success with that approach because of the clamping effect FastLED’s power management. After I figured out I had to determine the maximum brightness possible under power management conditions I found that the output of the LEDs looked linear to me using just a triangle wave, so I didn’t try to apply a correction curve. A point that confuses me is whether setBrightness() is actually controlling the brightness or the luminance. I couldn’t find a correction curve being applied when looking through the FastLED code.


The function calculate_max_brightness_for_power_mW returns the same value as calculate_max_brightness_for_power_vmA so I’m mentioning it in this write-up to help people find info on it too.
 
 
My example breathing code on GitHub
FastLED’s notes on power management
Power management functions documentation
LED Brightness to your eye, Gamma correction – No!


Making a Pulse Oximeter Using a TSL230R and a ATmega32u2 January 27, 2019

Filed under: Electronics,TSL230 — jethomson @ 11:07 pm

I created a pulse oximeter sensor using an ATmega32U2, a TSL230R, one red and one IR LED, and a clothes pin. The ATmega32U2 is used to read the frequency data from the TSL230R, control the LEDs, and send a stream of data to the host machine over USB. I wrote the code for the microcontroller in C and utilized the LUFA framework.

I wrote a python program called pulseox_graph.py to receive the data from the microcontroller and display the photoplethysmogram, heart beat, oxygen saturation data.


TSL230R-pulse-oximeter on GitHub